
Would you like to receive e-mail notifications on a daily, weekly or monthly basis with a specific content related with your Project?
With Xporter 5.0 you can set up schedule reports in less than 1 minute. In this post we’ll play a little with this Xporter feature but you can also read more about it in this previous blog post.
The Scheduled Reports are reports which will be triggered on a user-defined periodicity, using cron expressions.
More on cron expressions: here and here
A Scheduled Report is configured with a template and a target exportation context. The exportation context can be:
- a user defined JQL
- a user pre-existent filter
- a Xporter Report.
As output configurations, there’s the filename, the output format and the storage location. The filename is the name of the generated report, which may contain placeholders. The storage location is multiple choice, meaning all options can be on, off, or any combination of this options.
- Save locally: Define the fullpath where the file should be stored on the local machine where JIRA is running.
- Upload File: Select a previously defined File Server to upload the exporter report.
- Send Email: Send the report as an email attachment to JIRA users or to plain text email addresses.
If all options are off, the exported file will be placed on the JIRA directory
Creating a new Scheduled Report
Use case: Generate a daily report for a certain project, send it by email to the project manager and upload it to a pre-configured confluence page.
In order to satisfy this use case, we need break it down to requirements:
- User filter: In this example we’re using a project called EPIC. This is the JQL to be used: project = EPIC AND updated >= -1d.This represents the issues updated in the last 24h and is saved as a user filter EPICDaily.
- Email recipient: The project manager on this use case is a JIRA user named admin.
- Cron Expression: We want the report to be triggered every day at 3:00am. This is the expression to be used: 0 0 3 1/1 * ? *.
- Confluence Page: I’ll need a previously configured File Server. In this example we’re using a File Server called Confluence Page.
- Template: We’ll be using a template from our Template Store, Issue List Excel (IssueListExcel.xlsx). The output name will be Epic_Daily_Report.xlsx
Accessing the administration page Scheduled Reports, I can create a new Scheduled Report by clicking the button Add New Scheduled Report. Below’s a screenshot with the configuration of the previous requirements.
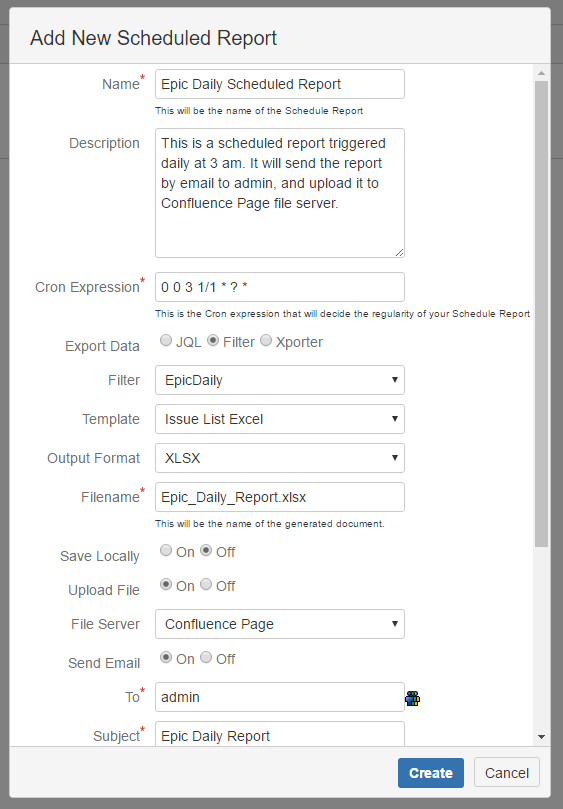
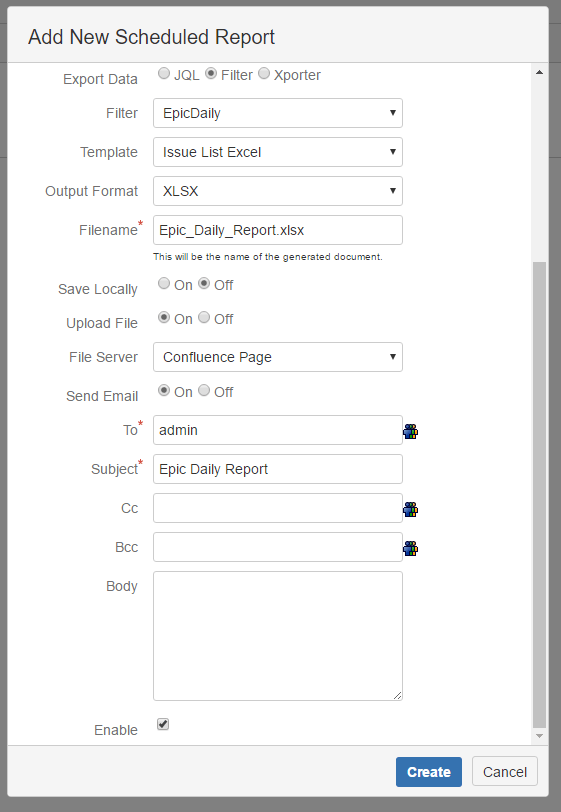
We’re enabling the scheduled report right away and I’m all set!
Scheduled Reports can also be enabled and disbaled on the Scheduled Reports management page, on the Operations column
Thank you for reading and being part of our great Xpand Add-ons family!


